Script configuration, best practices, and troubleshooting tips.
Step 1 — Create your Website Configuration
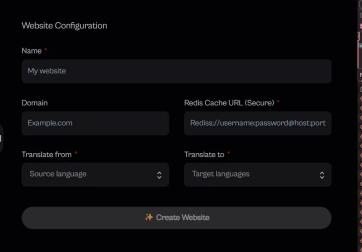
In CAMB AI Studio, open the Website Configuration form and fill in the following:- Name — A friendly name for your project (e.g.,
My website). - Domain — Your production domain (e.g.,
example.com). - Redis Cache URL (Secure) — A secure
rediss://connection string for caching translations. See Set up Redis with Upstash if you don’t have one. - Translate from — The source language for your content.
- Translate to — One or more target languages.
Step 2 — Add the script in Next.js
Integrate the script using Next.js’snext/script in pages/_app.tsx. Make sure the data-api-key attribute comes before the strategy prop, exactly as shown below.
pages/_app.tsx
data-api-key attribute securely passes your key to the client script.
Optional — Manage the API key via environment variable
If you prefer not to hard-code the key, expose it asNEXT_PUBLIC_TRANSLATOR_API_KEY and pass it to the Script tag:
.env.local
pages/_app.tsx
Step 3 — Deploy and verify
- Deploy your Next.js app as usual (Vercel, Netlify, or your preferred platform).
- Open your site in a browser and confirm that a translation dropdown appears automatically.
- Switch languages and verify page text is translated without layout shifts or flashes.
Best practices for a great UX
- Warm the cache. After deployment, visit your key pages yourself and wait for the initial translation to complete so future visitors get instant translations.
- Keep phrases intact. Avoid splitting single words or short phrases into many tiny elements — translation accuracy is higher when the translator sees whole sentences.
Exclude content from translation
Use HTML attributes or classes to skip specific elements:Style the translation dropdown
Customize the dropdown via CSS variables:Troubleshooting
No dropdown is visible
No dropdown is visible
Verify that
pages/_app.tsx includes the Script block and that your API key is correct. Hard-refresh the page (Cmd/Ctrl + Shift + R) and check the browser console for script errors.Translations don't appear instantly
Translations don't appear instantly
The first pass may be warming the cache. Visit the page once and try again — subsequent loads will pull translations from Redis.
Ad blockers or extensions
Ad blockers or extensions
Rarely, browser extensions may block third-party scripts. Test in a clean browser profile or incognito window.
Security & configuration notes
- Only use the official script source:
https://storage.googleapis.com/website-translation-script/translator.js. - Prefer environment variables (
NEXT_PUBLIC_TRANSLATOR_API_KEY) for manageability across environments. - Use a secure Redis URL. Your Redis Cache URL must use
rediss://(TLS-encrypted) — never plainredis://.